
U-SYNC Troubleshooting
# Long calibration
Calibration is a necessary step to ensure the sync between your device and your DAW. The sync is disabled during calibration.
Under normal conditions, the U-SYNC Plugin will only need to calibrate once, when connecting to a device (i.e. when loading the DAW session or adding the plugin).
But it will need to recalibrate if:
the plugin is reloaded, bypassed, or disabled
the device is disconnected
the sample rate or buffer size changes
in some cases, when the “Latency Adjustment” in the plugin is changed (more exactly, when this changes the reported latency of the plugin)
In Logic Pro, Pro Tools, Cubase and Nuendo, selecting or record-enabling the U-SYNC track can also trigger recalibration. Avoid doing this.
Calibration typically takes around 1–2 seconds at 48kHz, and around 4–5 seconds at 44.1 kHz. In some rare cases, it may take up to 10 seconds.
If your plugin is calibrating for more than 10 seconds, please try the following:
In Reaper, make sure to set the U-SYNC Track performance options to “Prevent anticipative FX”
in the U-SYNC plugin, click disconnect and then select your device again - this will restart the calibration
do not press play in the DAW or change any settings in the plugin until the calibration finishes
If this does not help, try these in this order:
make sure the right audio interface and right audio driver is selected (U-SYNC only supports ASIO drivers on Windows)
make sure your buffer size is a power of two and not above 1024 - 64, 128, or 256 are great values
try setting your audio sample rate to 48kHz
try with a different audio interface
If none of this helps, try asking the community or reach out to our support.
# Bi-directional control not working
U-SYNC handles the sync of Nome to the DAW, so when you press play in the DAW, the Nome and any machine connected to it follows.
To get bi-directional control, aka to add control of the DAW from the Nome as well, you will need to make sure the “U-SYNC Nome” Control Surface (also called Controller or MIDI Remote script in some DAWs) is enabled in your DAW and connected to the “DAW Control” port of the Nome.
In most DAWs the Control Surface is detected and added automatically. Make sure that:
The Nome U-SYNC integration for your DAW is installed
Your Nome firmware is up to date
You can see the device’s DAW Control USB-MIDI port:
For Nome II on macOS, the port is Nome II DAW Control.
For Nome II on Windows, the port is MIDIIN2 (Nome II).
For Midronome, look for the DAW Control port under the Midronome device name.
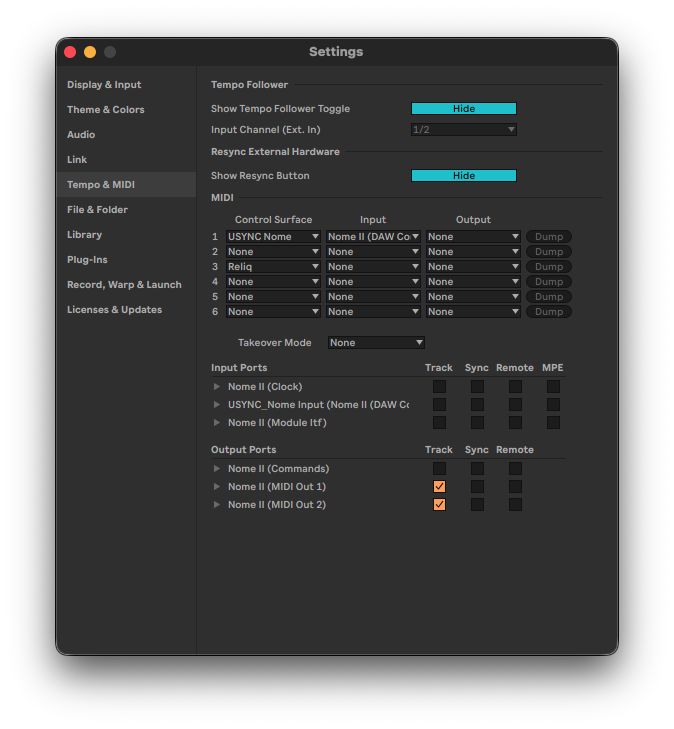
In Ableton, open Settings -> “Link Tempo MIDI”: the “U-SYNC Nome” Control Surface should already be there, and connected to the “DAW Control” input, and no output.
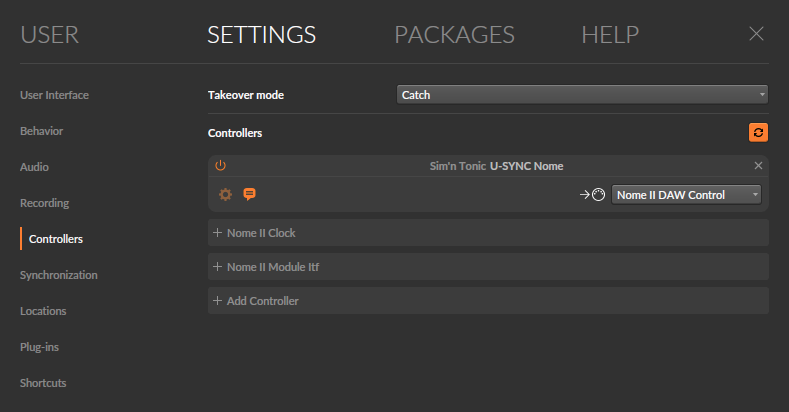
In Bitwig, open Settings -> Controllers: the “U-SYNC Nome” Controller should already be there, simply click on it to enable it. If not try pressing the refresh icon a few times.
In Cubase or Nuendo, the Control Surface is called a “MIDI Remote Script”, and it should be added automatically. Open the Lower Zone and check the “MIDI Remote” tab, you should see the “Sim’n Tonic U-SYNC Nome” there.
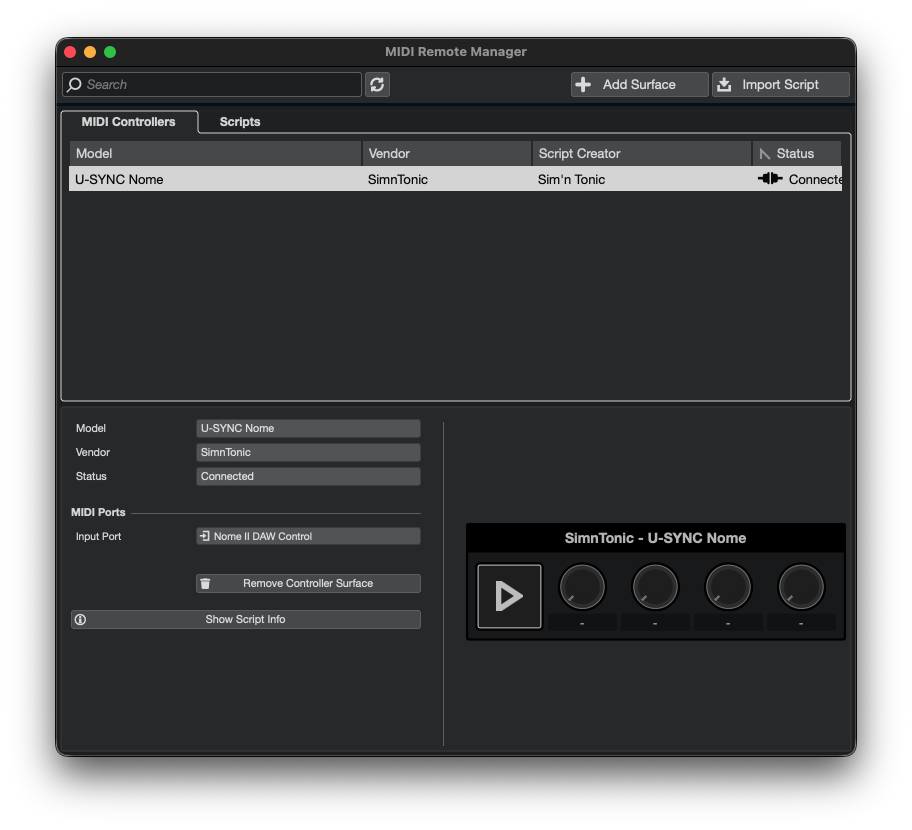
Please note that Cubase or Nuendo will only allow to connect one MIDI Remote at a time, so you cannot get more than one Nome controlling the DAW.
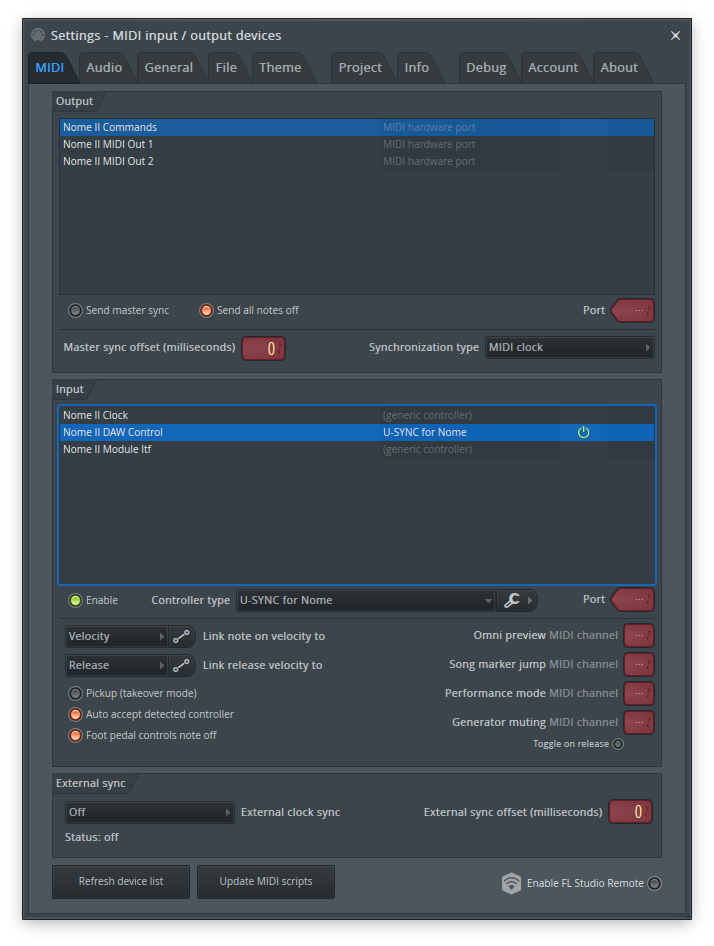
In FL Studio the U-SYNC Nome Controller should be added automatically. Open Settings -> MIDI, and check that under “Input”, you can see the “DAW Control” (or MIDIIN2 on Windows) for the Nome, and that it has the “U-SYNC Nome” Controller set to it. Then enable it.
In Reason the Control Surface is automatically detected, but you need to manually press a button to add it. Open Preferences -> MIDI, and press “Auto-detect Surfaces”.
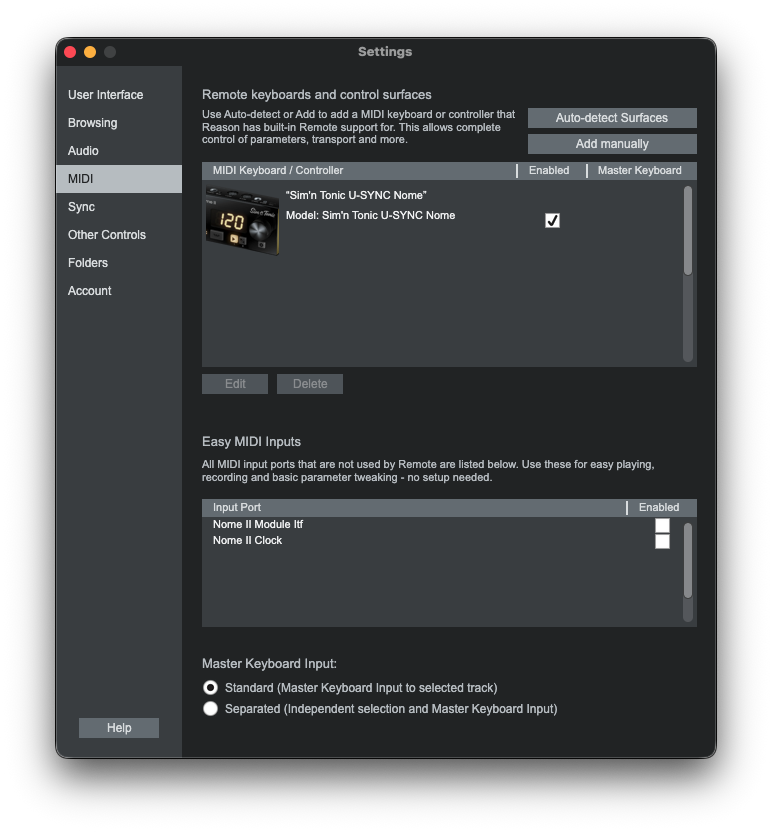
In Logic you need to manually map the MIDI messages sent by the Nome to specific actions like Tempo and Start/stop. When selecting the Logic integration in the U-SYNC installer, you will get a PDF with specific instructions.
Reaper requires a few manual steps to be controlled by your Nome. When selecting the Reaper integration in the U-SYNC installer, you will get a PDF with specific instructions.
Bi-directional control is unfortunately not possible in Avid Pro Tools, Fender Studio Pro, or UA LUNA.
If none of this helps, try asking the community or reach out to our support.
# Monitoring through your DAW
DAWs usually have a monitoring timing and a recording timing.
The monitoring timing is as fast as possible, to avoid any latency between the real world and what you hear.
The recording (and playback) timing, on the other hand, makes sure your CPU can process heavy plugins without overloading, and that all tracks are on time with each other.
DAWs give you tools to adjust those timings, like the main buffer size, in some DAWs a second “processing” buffer size (used in non-monitoring timing only), and a low-latency monitoring option.
U-SYNC is designed to get your recordings on the DAW grid, and for that it works with the recording timing.
Using U-SYNC while monitoring through your DAW can be difficult. If you can avoid it, by monitoring directly through your audio interface or an audio mixer, then do it.
If you really have to monitor through your DAW, Ableton 12 came with a great option called “Keep Latency”. You will see that option by enabling “Track Options” in View -> Mixer Controls. It is only relevant on tracks which have monitoring on. By default (when the option is enabled), Ableton will leave the recordings at the “monitoring timing”. If you turn it off, Ableton will still give you low-latency monitoring but after you record it will move the recordings to the “recording timing” which is the one used by U-SYNC. Long story short, with the “Keep Latency” option disabled, your hardware will record on the grid even if you monitor the track through Ableton.
Most other DAWs have similar options:
Bitwig does this by default
Cubase also does this by default
Logic also does this by default
FL Studio also does this by default
Reason has unfortunately no equivalent option, it seems the only way is to disable monitoring
If you cannot find something similar in your DAW, you will have to accept that the recordings will probably be late by a set amount. Using negative Latency Adjustment in the U-SYNC plugin will not work as this uses the DAW’s Plugin Delay Compensation, which does not affect the monitoring timing (for a good reason).
# The timing is not right
# Case 1 - the Latency Adjustment in the U-SYNC Plugin has no effect
Make sure that your hardware is actually sync’ed to the Nome. Changing the tempo and pressing play on the Nome should affect your hardware. Make sure your hardware is not sync’ed to the DAW’s MIDI Clock (but to the Nome’s). Make sure Plugin Delay Compensation is not disabled in your DAW. Make sure you are not monitoring through your DAW (see Monitoring through your DAW).
In FL Studio, leave the plugin track connected to the Master output. If you get strange issues like resyncing and jumping, disable the “Safe overloads” in the Audio settings.
In Logic, make sure the Multithreading is set to “Playback & Live Tracks”, that the Processing Buffer Range is set to Medium, and that you are neither selecting nor record-enabling the U-SYNC Track.
In Reaper, make sure to set the U-SYNC Track performance options to “Prevent anticipative FX”
# Case 2 - the notes from my DAW are not on time with the rest
For now, U-SYNC only deals with MIDI Clock, and MIDI Start/Stop. That means you should use it when your (note) sequence is from your hardware, and not from a track in your DAW.
Sending your MIDI notes from the DAW directly means your hardware plays those notes when it receives them, ignoring the clock sent by the Nome entirely. Those notes, as well as other MIDI data like CC or PitchBend, can also be sent through the Nome by using the USB-MIDI interfaces called “Nome II MIDI Out 1” and “Nome II MIDI Out 2”. The Nome will smartly merge those with its clock, adding zero jitter to the clock, and send them to your hardware.
But even though they go through the Nome, those notes do not go through U-SYNC, they go through your DAW’s USB-MIDI data path. So they will be unaffected by any U-SYNC timing adjustment. In a future version of U-SYNC we might add support for sending MIDI Notes through the plugin as well.
# Case 3 - The latency seems to be moving with the BPM
The underlying layer of U-SYNC is working at the audio level and is completely ignorant of the BPM - any latency within the U-SYNC system simply cannot be affected by the BPM.
Therefore, if you experience this, it must mean your recordings are delayed by an actual beat or a part of a beat. This could be a setting on your hardware sequencer itself, where for example the sequence starts 1 step later.
# Case 4 - I cannot auto-detect the latency
Follow the steps shown inside the plugin. If it cannot measure the latency, check the following:
Wait for U-SYNC calibration to finish before recording, and make sure your hardware follows the Nome’s clock.
Record across a bar change, then stop recording before playing the recording back into U-SYNC. Keep the clip in its original position and leave Latency Adjustment unchanged between recording and detection.
Check that the recorded audio or MIDI reaches the plugin, using the recording option and routing shown in the flow. Send the recording back, not the live input.
Check your monitoring settings; see Monitoring through your DAW.
After detection, remove any temporary sidechain routing as instructed by the plugin.
# Case 5 - I cannot get all my hardware on the grid
This is a well-known limitation of the Nome: there is only one latency slider to adjust, so if you use for example a TR-1000 which requires -50ms of latency adjustment, all your other hardware is likely to be 50ms early as well.
In the meantime there are workarounds:
Use 2 Nomes, each one sync’ed with its U-SYNC plugin and its own latency slider.
Even though it is not on the grid, your hardware will have a stable latency (always the same). Thanks to this you can easily compensate for it using a timing shift in your DAW, like a DAW plugin/device, track delay, etc.
Note that we are working on this and hope to release a Nome firmware in the future, with a way to adjust the timing on the MIDI Out 2 Port of the Nome.